Typecho评论增强插件:TeComment(2017.09.07更新)
TeComment(2017.09.07更新)
Typecho 评论增强插件,可为Typecho评论增加评论工具栏、实现评论列表异步加载以及Ajax提交评论功能
插件地址:TeComment
1、安装插件
- 下载插件后,确认插件文件夹名称为
TeComment, - 上传插件文件夹
TeComment至网站目录usr/plugins/ - 进入后台,在导航
控制台 > 插件页面,选择启用TeComment插件
2、使用插件
2.1、评论工具栏
安装好插件后,要想显示评论工具栏,需要修改当前所使用主题的comments.php文件:
在textarea标签后插入如下代码(可自行确定放置位置)
<?php TeComment_Plugin::showTool();?>2.2、使用评论列表异步加载或Ajax提交评论功能前提
在开启评论列表异步加载或Ajax提交评论功能前,需要修改当前所使用主题的functions.php文件:
若functions.php文件中添加或替换threadedComments函数为
/**
 * 重写评论显示函数
 */
function threadedComments($comments, $options){
    $html = TeComment_Plugin::parseCommentHtml($comments, $options);

    $children = '';
    if ($comments->children) {
        ob_start();
        $comments->threadedComments();
        $children = ob_get_contents();
        ob_end_clean();
    }
    $html = str_replace('>{children}<','>'.$children.'<',$html);
    echo $html;
}
2.3、评论列表异步加载功能
要开启‘评论异步加载’功能,在插件设置页面启用‘评论异步加载’后,还需要修改当前所使用主题的comments.php文件:
代码
<?php $this->comments()->to($comments); ?>
<?php if ($comments->have()): ?>
<?php $comments->listComments(); ?>
<?php $comments->pageNav('« 前一页', '后一页 »'); ?>
<?php endif; ?>修改为
<?php if($this->options->plugin('TeComment')->commentAjaxLoad): ?>
<div id="comment-ajax-list" data-cid="<?php $this->cid();?>" data-num="<?php $this->commentsNum();?>" data-comment-page="<?php echo $this->request->commentPage;?>"></div>
<?php else: ?>
<?php $this->comments()->to($comments); ?>
<?php if ($comments->have()): ?>
<?php $comments->listComments(); ?>
<?php $comments->pageNav('« 前一页', '后一页 »'); ?>
<?php endif; ?>
<?php endif; ?>代码
<?php $comments->cancelReply(); ?>修改为
<?php echo '<a id="cancel-comment-reply-link" href="' . $this->permalink . '#' . $this->respondId . '" rel="nofollow"' . ($this->request->filter('int')->replyTo ? '' : ' style="display:none"') . ' onclick="return TypechoComment.cancelReply();">'._t('取消回复').'</a>'; ?>2.4、Ajax提交评论
要开启‘Ajax提交评论’功能,只需要在在插件设置页面启用‘Ajax提交评论’即可
此功能兼容系统默认的反垃圾保护功能
2.5、评论模板
为了实现评论列表异步加载和Ajax提交评论功能,插件引入了评论模板,默认的评论模板为:
<li id="{theId}" class="widget {commentClass}">
    <div class="comment-meta">
        <div class="comment-meta-avatar">{authorAvatar}</div>
        <div class="comment-meta-author">
            <strong>{beforeAuthor}<a href="{authorUrl}" rel="external nofollow" target="_blank">{authorName}</a>{afterAuthor}{commentStatus}</strong>
        </div>
        <div class="comment-meta-time">{beforeDate}{created}{afterDate}</div>
            <div class="comment-meta-reply">{replyLink}</div>
        </div>
    <div class="comment-content">{content}</div>
    <div class="comment-children">{children}</div>
</li>
可根据模板的需要自行设计评论模板,可用参数包括:
{theId}评论锚点ID{commentClass}评论列表样式{authorAvatar}评论用户头像{authorName}评论用户名称{authorUrl}评论用户主页{authorUrl}评论用户邮箱{created}评论发布时间,时间格式为后台设置的格式{replyLink}回复评论的链接{content}评论内容{children}子评论
旧版
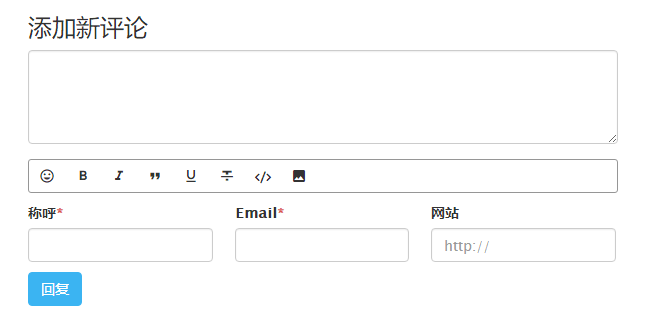
前段时间,有朋友在博客留言,提及评论时怎么贴图。 刚好自己闲逛时发现张戈博客评论框下面的工具栏,或许可以用用。但是其博客程序为wordpress,不能使用,那就自己动手写吧
先看效果图:

js效果部分参考了张戈博客中的代码
工具栏中,表情的功能基本上是拷贝自羽中漫步的Smilies插件,可在后台设置使用的表情包
使用方法:
<?php TeComment_Plugin::showTool();?>
启用插件后,在comments.php文件的合适位置加上以上代码即可
下载地址:TeComment


